kitchen island makeover


Adding a DIY & Decor section to the blog just to spice things up a little! This fall, I am really into DIY, chalk painting, and Farmhouse decor! Farmhouse decor is my new obsession, so you’ll see some of that soon! There have been quite a few people who have asked how I did my kitchen island makeover, so I will share here.

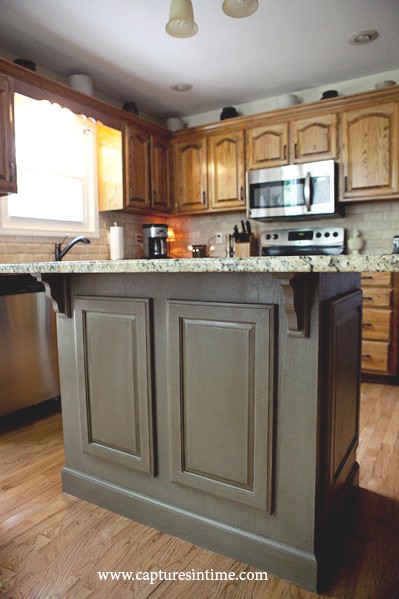
In 2012, we had updated the kitchen with new granite and backsplash. The kitchen island suddenly screamed “builder grade”. So, I got the itch to do some work on it. It just looked so tiny and boring under that big slab of granite and needed some bulk. This was super easy to do, my husband did cut the baseboards for me but I was able to complete the rest on my own. Pinterest did not show any tutorials using cabinet doors, but did see quite a few really good tutorials out there to get me started.
- 4 1/4″ primed baseboards cut with miter saw
- four 9′ x 24′ unfinished raised-panel kitchen cabinet doors – These will run about $213 through Cabinet Door World, but I did find them on eBay for under $25 a piece back when I started this project.
- 2 wood corbels
- Optional faux “feet” for the bottom front
- Rustoleum Cabinet Transformations in Meadow Glazed – not seeing a link at Home Depot, but that is where I purchased mine.
- Misc supplies: Liquid Nails, sandpaper, wood filler, joint compound
- Kilz Latex Primer – on new wood additions only.
Prep–
Wash island with dish soap and water. For older cabinets, you want to scrub them with something a bit scratchy to get the gunk off. The goal is for the paint to adhere well. Wash, then allow to the cabinets to dry. Lightly sand and rinse with water.
Mounting the cabinets–
Measure out spacing and height for the cabinet. Use Sharpie to mark their place. Use a level to make sure the doors are straight and screw the doors in place. I ran a line of extra-strength wood glue along the top of the cabinet and the top of each corbel, but I don’t know that this was necessary. I used three screws on the top, sides, and bottom. Fill holes with wood filler. Joint compound the seams.
Mounting the corbels–
Depending on the style you get, you might not have room on the edges to use screws, so do think about that when selecting. You can mount them from inside the island as well if you can reach that area from inside.
Mounting the faux feet –
I used 1/2 inch thick ornate blocks, put wood in the center and “created’ my own blocks the right size to fit at my corners in the front. I just felt like it needed a little something.
After filling the seams, holes, sand and wipe down entire island. Allow to dry.
Painting:
I primed all of the new wood pieces with one coat. The Rustoleum kit gives you a primer. However, it is really meant to go over wood that already has poly or paint on it. Next, I used the Rustoleum primer over the parts with bare wood. Allow to dry several hours. Two coats of the Rustolem paint were used. Follow the instructions on the kit with the glaze and top coat. In the end, I was not wild about the glaze, so I didn’t use much of it at all.
Four years later, the Rustoleum paint has held up very well! I am getting ready to update the kitchen and go white cabinets. I am thinking gray for the island this time for a little update as the green is getting a tad old and I am transitioning to cooler tones.
These are not great pictures, I just snapped some quick ones to send my mom before and after!


